What Is the Difference Between Cantilever and Anchored Steel Sheet Pile Walls?
Pick the wrong wall system and you pay for it twice — once in steel, once in schedule. Here is how the two systems really behave on site.
A cantilever steel sheet pile wall gets all of its support from the embedded toe, so it works best for walls up to about 5 to 6 m. An anchored wall adds tie rods and anchors, which cut deflection and push the safe height well past 10 m.
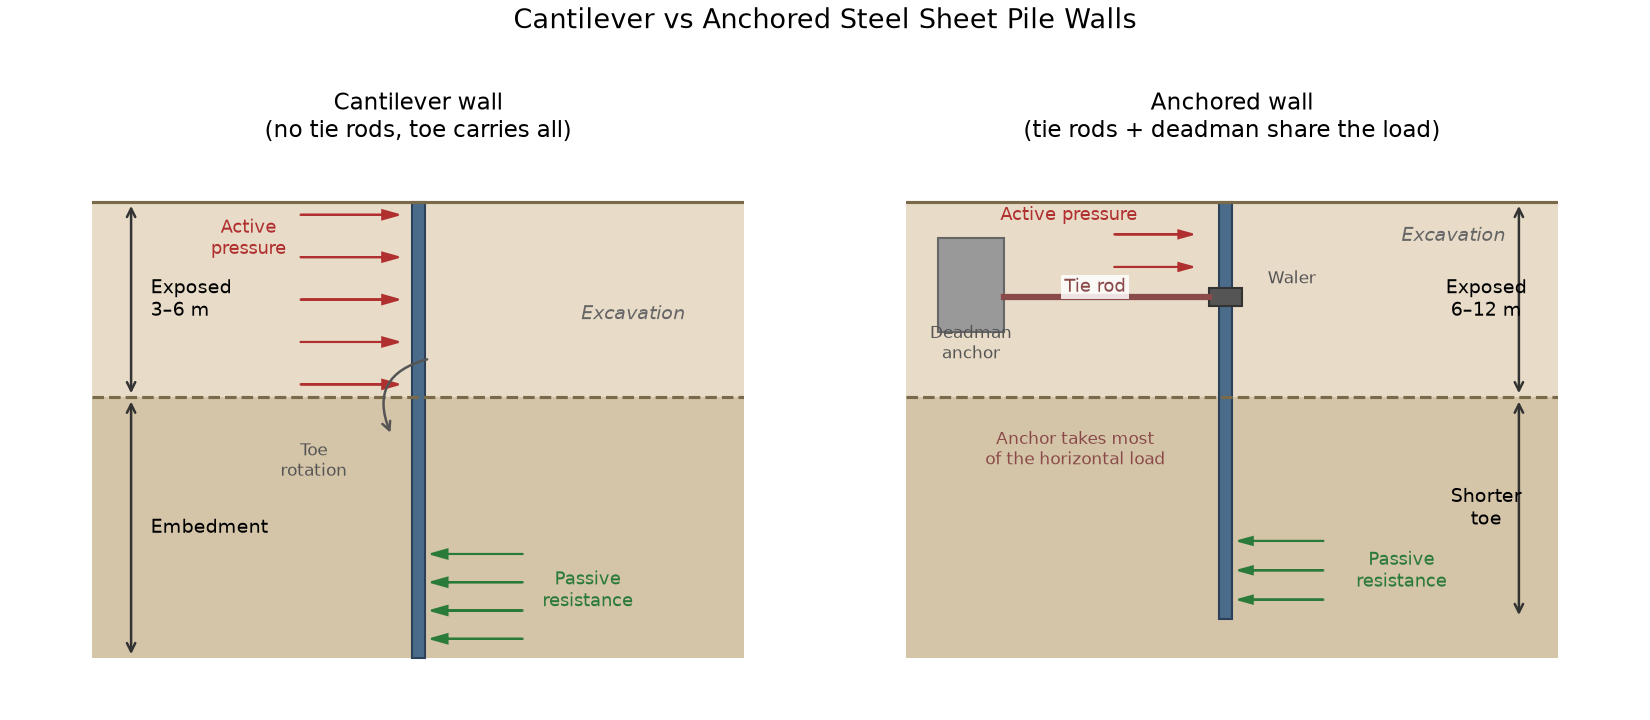
I handle export sales for a steel sheet pile factory in Liaocheng, Shandong, and this question lands in my inbox almost every week. Contractors from the Middle East, Australia, and Africa compare two quotes, see one wall with tie rods and one without, and ask me which one they actually need. My honest answer is that both systems often use the very same piles. The difference is not the steel. The difference is how each wall borrows strength from the ground. That one idea changes the height you can build, the movement you should expect, the temporary works you must plan, and the money you will spend. In this guide I explain it the same way I explain it to buyers on a video call: plain words, real numbers, and the mistakes I have watched people make with cantilever and anchored steel sheet pile walls.
How Does a Cantilever Steel Sheet Pile Wall Get Its Strength?
Most buyers underestimate what the buried part of a cantilever wall does. That hidden toe carries everything, and it fails quietly when you get it wrong.
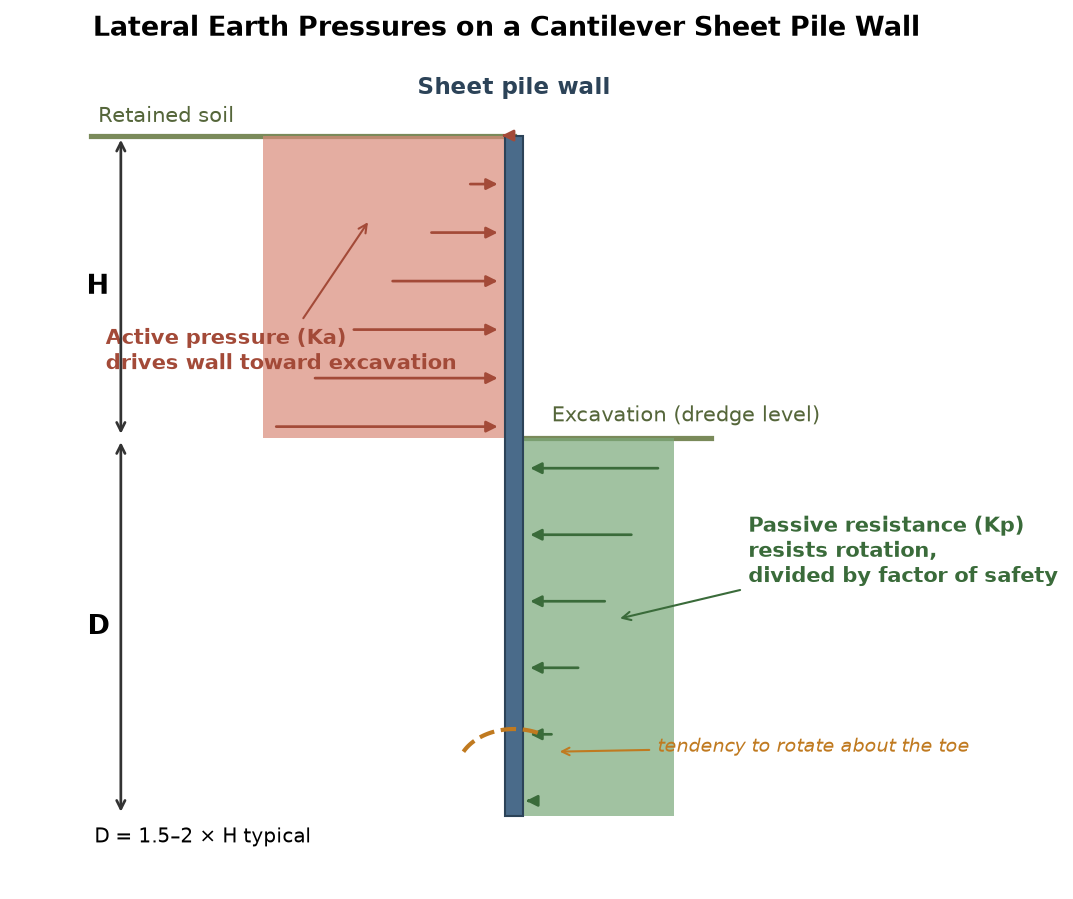
A cantilever wall works as one deep vertical beam. The soil behind the wall pushes it, and the embedded toe rotates against passive soil pressure until the forces balance. No tie rods, no anchors, no external support at all.
How the Load Path Works Below the Excavation Line
When we dig on one side of a cantilever wall, the retained soil applies active pressure over the exposed height. The wall cannot lean on anything above grade, so the embedded toe must push back against the soil in front of it. The front side of the toe mobilizes passive resistance, and the back side of the toe adds a balancing pressure as the wall tries to rotate. Engineers call this the fixed-earth or free-earth method, and the choice changes the required embedment depth and the bending moment in the pile.
I like to describe it with a simple picture. Hold a ruler in a block of clay and push the top. The ruler bends, the clay grips the bottom, and if the grip is too shallow the ruler tips over. A deeper grip means a stiffer feel and a smaller top movement. A cantilever sheet pile wall behaves the same way, except the “clay” is real ground that follows the rules of soil mechanics, with layers, water, and weak spots. This is why the same pile section can be fine at 4 m and scary at 7 m. If you want the full design background, our article on the design principles of steel sheet pile retaining structures walks through the pressure model step by step.
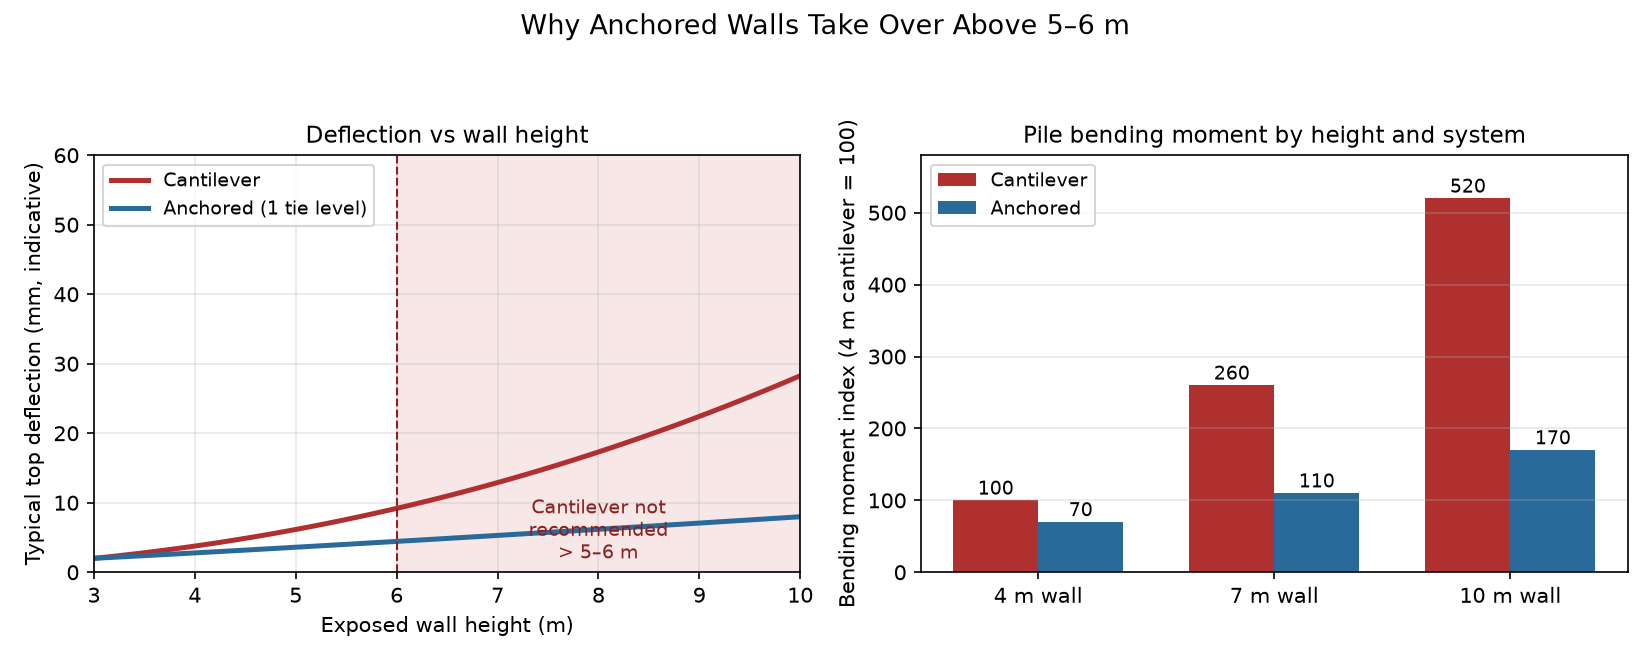
The practical consequence is that deflection grows fast with height. At 3 to 4 m, a cantilever wall in decent soil moves very little. At 6 m, top movement of 30 to 60 mm is normal and must be accepted by the design. Past that, the moments and movements climb so quickly that adding one tie rod level is almost always cheaper than stepping up two or three pile sections. I have quoted both options for the same pit, and the cantilever version with big Z piles usually lost on price once the buyer added the extra driving depth.
| Factor | Cantilever wall behavior | What it means for you |
|---|---|---|
| Support source | Passive soil below excavation line | Soil quality controls everything |
| Practical height limit | About 5–6 m in average ground | Taller walls need anchors or much heavier sections |
| Top deflection | Small at 3–4 m, 30–60 mm at 6 m | Confirm adjacent structures accept the movement |
| Bending moment | Peaks near the excavation line | Section modulus drives the steel cost |
| Sensitive to | Dredging, surcharge, weak soil at toe | Protect the toe; never over-dig |
A cantilever wall is elegant because it needs no hardware above ground. But that elegance is exactly why you must respect the ground conditions more, not less. Before you fix the section, check the structural strength and load-bearing capacity of steel sheet piles against the moment your wall will see, and remember that the moment grows with the square of the exposed height, not in a straight line.
What Makes an Anchored Steel Sheet Pile Wall Different?
An anchored wall looks similar from the front, but everything changes once you add one row of tie rods. The wall stops fighting alone.
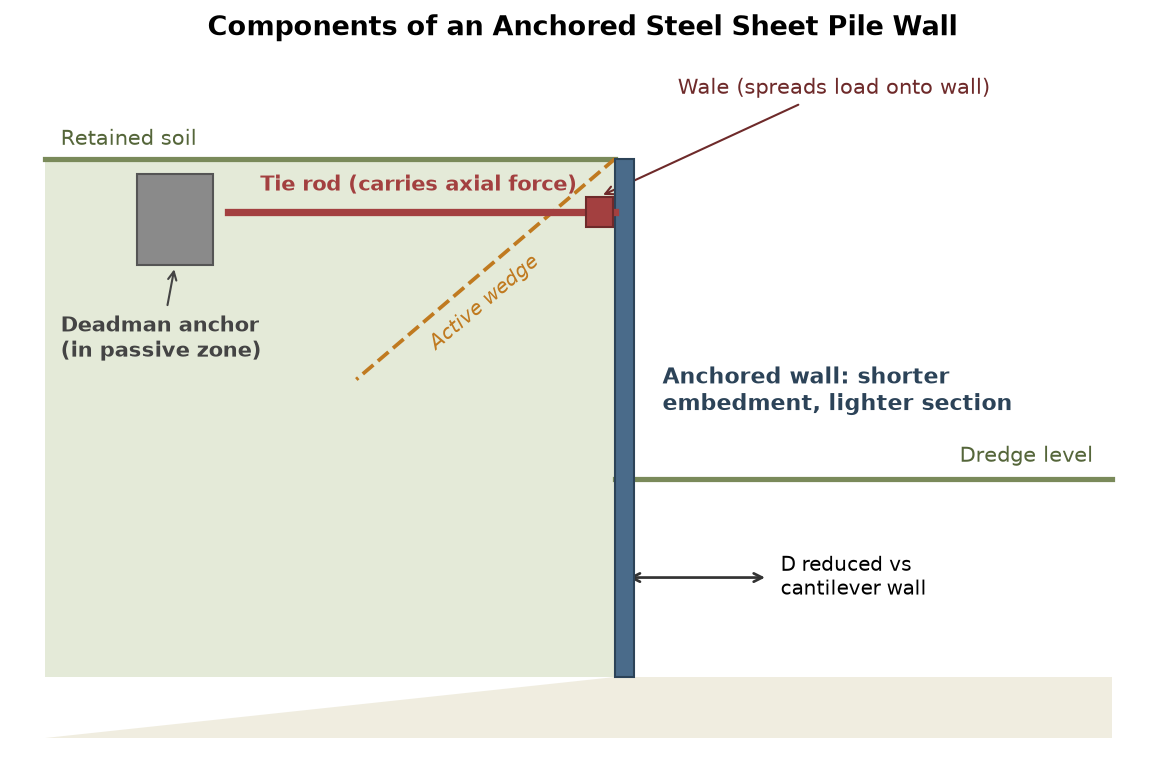
An anchored wall connects the sheet piles to a deadman anchor or soil anchor through tie rods and walers. The anchor takes most of the horizontal load, so the pile sees less moment and the wall moves far less.
The Load Path With Tie Rods and Walers
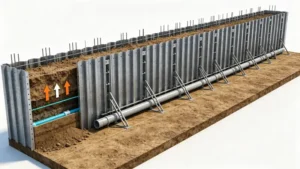
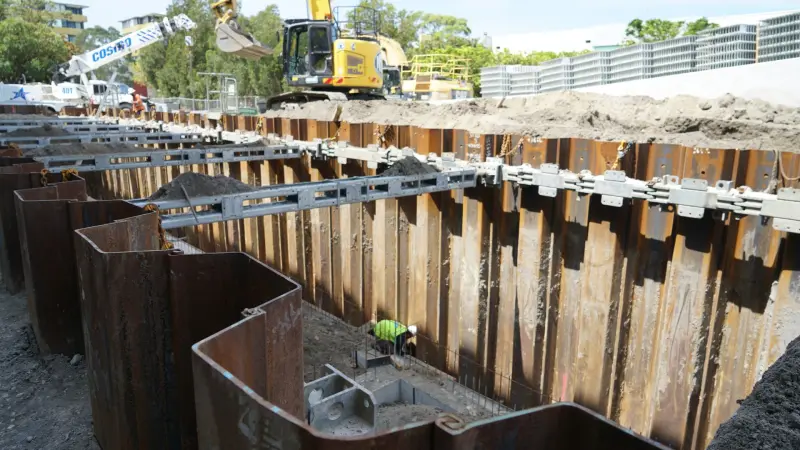
In an anchored system, each sheet pile passes its load to a waler — a horizontal steel beam bolted across the wall face. The waler collects load from many piles and hands it to tie rods spaced every 2 to 3 meters. The rods run back to an anchor body: a concrete deadman block, a mass of soil between shear keys, or grouted ground anchors drilled deep behind the wall. The critical rule is that the anchor must sit outside the active failure wedge of the wall. If the deadman is too close, the anchor and the wall fight over the same soil and neither one works.
This split changes the design completely. The pile now behaves more like a simply supported member between the anchor and the toe, so the bending moment drops and a lighter section can hold a taller wall. Deflection drops too, because the top of the wall is held back instead of left free. For port quay walls, bridge abutments, and deep basement boxes, this is the standard answer. Our own case notes on sheet pile wall height and section selection show the same pattern: above roughly 6 m, one anchor row beats a bigger cantilever section on both price and movement.
Anchors also bring water benefits. A tied-back wall lets you keep the excavation drier because the wall stays stiff while dewatering runs. For cofferdams and waterfront work, check the waterproof performance of interlocked steel sheet piles as part of the same decision, because seepage and anchor works interact in soft or sandy ground.
The price of this strength is logistics. You need space behind the wall for the rods and the anchor body. You need a waler level, rod sleeves through the piles, corrosion protection on every rod, and a staging plan so the anchor zone is not excavated before the anchors are stressed. On tight city sites, that space simply does not exist, and that alone can rule out the anchored option.
| Component | Role | Common failure if ignored |
|---|---|---|
| Tie rods | Carry anchor load to the wall | Corrosion at splash zone, loose nuts |
| Walers | Spread load across many piles | Local buckling, uneven load sharing |
| Deadman anchor | Reacts against soil behind wall | Placed inside active wedge, so it drifts |
| Ground anchors | Deep grouted reaction for tight sites | Poor grouting in weak soil |
| Rod sleeves | Pass rods through piles | Sealing leaks below water table |
An anchored wall is not harder steel; it is smarter geometry. You trade visible hardware and back-of-wall space for lower moments, smaller movements, and taller walls from the same pile sections.
When Should You Choose a Cantilever Wall Instead of an Anchored One?
With both systems on the table, the real question becomes a decision rule. Height is the first filter, but it is not the only one.
Choose a cantilever wall for exposed heights up to about 5–6 m in average soil, where you have no room behind the wall and modest movement is acceptable. Choose an anchored wall above that, or whenever tight deflection limits matter.
A Decision Checklist I Use With Buyers
I ask buyers five questions in a fixed order. First, how tall is the exposed wall after excavation, and is any future dredge planned? If the answer is above 6 m, the cantilever option is usually out before we talk price. Second, what sits next to the wall? Roads, pipelines, or old buildings usually bring movement limits that only an anchored or braced wall can meet. Third, is there room behind the wall for rods and a deadman? On waterfront reclamation I often see 8 to 15 m of free ground; on urban street cuts I see none. Fourth, is the wall temporary or permanent? A temporary pit for a 3-month job tolerates more movement and corrosion allowance than a 50-year quay wall. Fifth, what is the ground at the toe? Soft clay or loose sand under the excavation line weakens the passive zone, and this hurts a cantilever wall far more than an anchored one.
Surcharge matters more than people expect. Stacked containers, cranes, or spoil heaps behind a cantilever wall add pressure over the full height, and the moment grows quickly. When a buyer tells me a crawler crane will work 2 m behind the wall, I almost always steer them toward anchors or internal bracing. Our comparison of steel sheet piles versus soldier piles covers a related choice, and the logic is similar: match the system to the load, not to the habit.
One more filter is water. A cantilever wall in a river or tidal zone sees both soil pressure and water pressure differences, and the toe must resist both. Factor of safety on passive resistance should be checked with the lowest expected water table on the retained side and the highest on the excavated side — this worst case is what governs, so apply a proper factor of safety rather than an average case. In layered or uncertain ground, a quick numerical check pays for itself; our guide to load calculation for steel sheet piles shows which method fits which soil profile.
| Site condition | Better fit | Why |
|---|---|---|
| Exposed height ≤ 5–6 m, firm soil | Cantilever | Cheapest, fastest, no hardware |
| Height > 6 m or future dredge | Anchored | Moment drops sharply with one tie level |
| Buildings or pipes close to wall | Anchored or braced | Movement control is the priority |
| No space behind wall | Cantilever or bracing | Anchors physically cannot fit |
| Temporary 3–4 m pit | Cantilever | Movement tolerance is high, reuse planned |
| Permanent quay wall 8–12 m | Anchored | Standard solution for marine structures |
| Soft clay at toe | Anchored with longer toe | Passive zone is unreliable for cantilever |
No single answer wins every site, and honest engineers say so. But this checklist catches about 90 percent of the cases I see in export inquiries, and it prevents the most expensive mistake: choosing a system by habit and then redesigning halfway through driving.
How Do Cost, Installation, and Risk Compare Between the Two Systems?
Steel price is only the first line of the comparison. The anchored system adds hardware, staging, and labor that the cantilever system never sees.
A cantilever wall usually wins on material cost below 5 m because it needs no tie rods, walers, or anchor works. Above that height, an anchored wall often wins overall because lighter sections and less embedment offset the anchor cost.
Where the Money Actually Goes
Let me walk through a real-style budget. For a 4 m cantilever wall in firm ground, your cost lines are piles, driving, and a small corrosion allowance. That is it. For a 9 m anchored wall, you add walers, tie rods with turnbuckles and locking nuts, anchor blocks or ground anchor drilling, and roughly one extra week of staging, because you must excavate to waler level, install the anchors, and stress them before digging below. Our breakdown of cost factors in steel sheet pile projects lists each of these lines in detail.
Installation order differs too. A cantilever wall can be driven top to bottom in one pass and excavated immediately, which is why contractors love it for simple pits. An anchored wall follows a strict sequence: drive piles, excavate to the waler level, install walers and rods, build and stress the anchors, then continue excavation. Skipping or rushing a step is one of the common challenges in sheet pile construction, and it shows up later as wall movement or cracked ground behind the wall. Vibratory driving suits both systems in most soils; the choice of hammer is a separate topic, covered in our installation methods comparison.
Risk profiles are different in kind, not just size. A cantilever wall fails by excessive toe movement — quiet, gradual, and visible if you monitor it. An anchored wall fails at its hardware: a corroded rod, a deadman that was cast inside the active wedge, or a waler that was never properly packed against the piles. Rod corrosion at the splash zone deserves special respect in marine and wastewater work; coatings and oversizing at that band are cheap insurance. From my side of the trade, the fix is boring but effective: buy rods with a corrosion allowance, document every anchor position on the as-built drawings, and put the wall movement readings into the weekly routine instead of trusting the eye.
| Cost and risk item | Cantilever wall | Anchored wall |
|---|---|---|
| Steel quantity | Heavier section, longer toe at height | Lighter section for same height |
| Hardware | None | Tie rods, walers, anchors |
| Installation steps | Drive, excavate | Drive, stage anchors, stress, excavate |
| Land requirement | Only the wall line | Space behind wall for anchor zone |
| Typical failure mode | Toe movement, over-dig | Rod corrosion, anchor inside wedge |
| Best value range | ≤ 5–6 m temporary and small walls | > 6 m, permanent, movement-critical |
Whichever system you pick, order the steel with the embedment included in the piece length. I have seen buyers calculate only the exposed height, then pay for a second shipment. Our guide on calculating sheet pile quantity from drawings prevents exactly that mistake.
My Take
From my factory desk, I see the same pattern every season. Buyers below 5 m fight for cantilever because it is cheap and fast, and they are usually right. Buyers above 7 m who insist on cantilever to “save the anchors” almost always come back for a redesign after their engineer sees the deflection. My own rule is simple: treat the anchor row as a tool, not an expense. For permanent walls, ports, and anything next to old structures, I recommend anchored systems with hot-dip or heavy-coat protection on the rods. And for both systems, I push buyers toward mill certificates, SGS pre-shipment inspection, and a toe length they will not regret — steel is cheap compared to a wall that moves.
Conclusion
Cantilever walls carry everything on the buried toe and shine below 5–6 m; anchored walls add tie rods and anchors to cut moment, movement, and risk on taller, permanent structures.
Tags: Cantilever Sheet Pile Wall · Anchored Steel Sheet Pile Wall · Tie Rod Anchors · Sheet Pile Selection · Retaining Wall Design