How to Select Steel Sheet Piles Based on Soil Conditions?
The soil report decides your wall, not the catalogue. I have quoted sheet pile projects on three continents, and soil mistakes are the most expensive ones I see.
To select steel sheet piles based on soil conditions, check soil strength, density, water table position, and permeability from your borehole log, then match the wall moment, embedment depth, and drivability to the worst layer the piles must penetrate and retain.
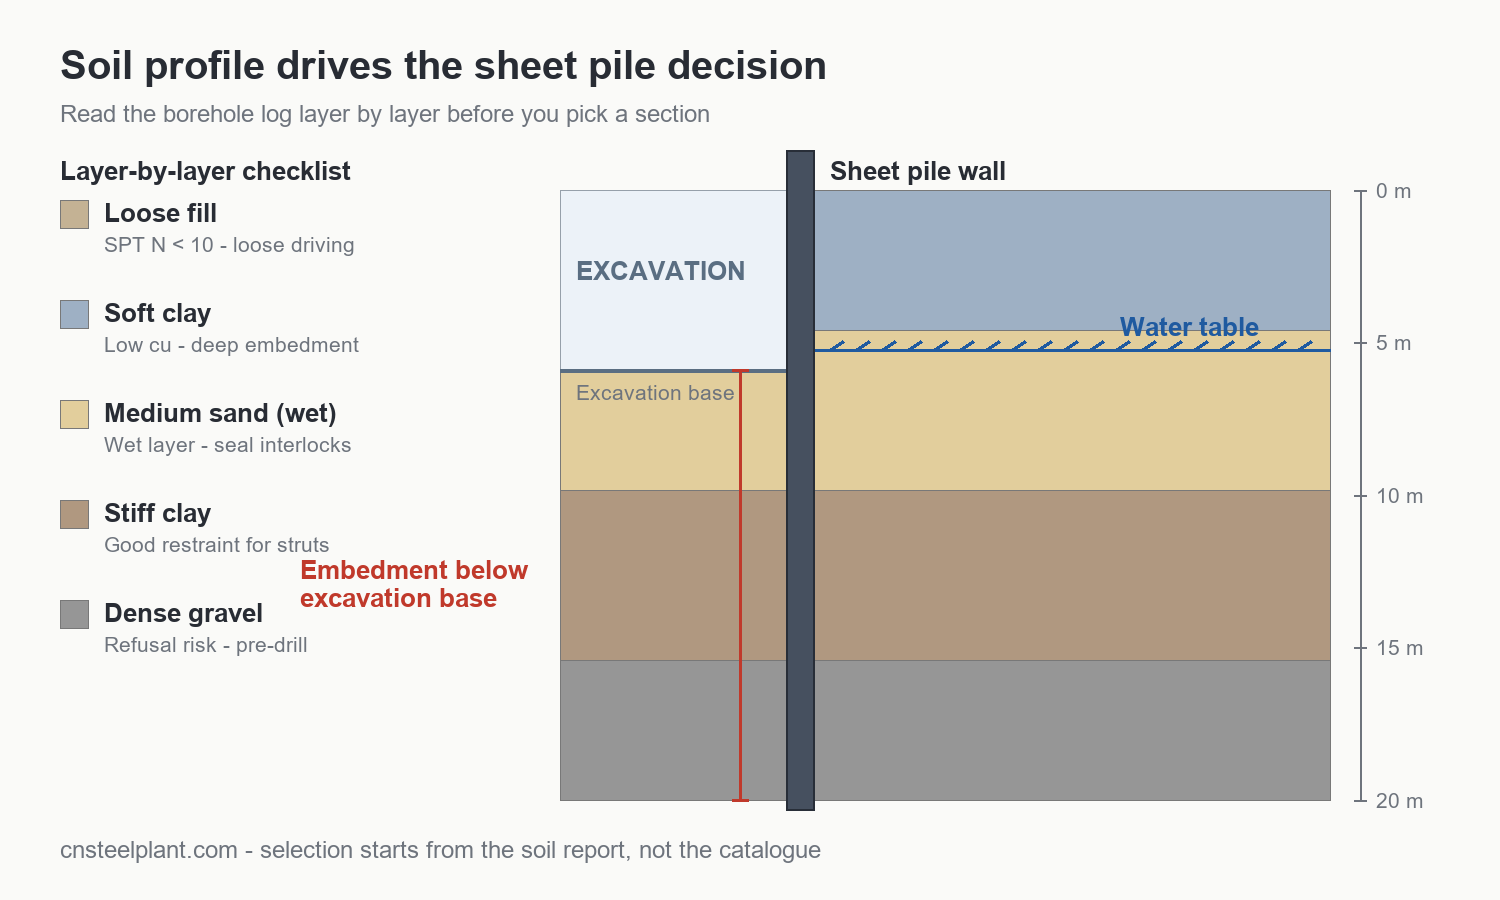
In this article, I will walk you through the same process I use when a contractor sends me a geotechnical report for a steel sheet pile wall. We will look at the soil properties that matter most, then at clays, sands, and water, and finally at the hard layers that break driving schedules. By the end, you should be able to read your own soil report and shortlist the right section before you ask for a price.
Which Soil Properties Should You Check Before Choosing a Sheet Pile?
Most selection errors start before the wall is even designed. Buyers send me a project location and a wall height, and I have to ask for the boring logs. Without them, any section choice is a guess.
Check five properties before you choose: soil strength, density from SPT N-values, water table position, permeability, and the depth of any dense or rocky layer that could stop driving. Together they decide the section, the embedment, and the installation method.
From borehole log to selection shortlist
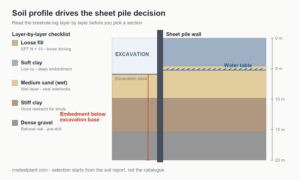
When I open a soil report, I read it like a story from top to bottom. Every layer adds a constraint or removes one. A standard penetration test N-value tells me how hard the driving will be. Shear strength in the form of undrained cu in clays and friction angle in sands tells me how much load the wall must resist. The water table tells me whether I am designing a soil wall or a waterproof barrier. Permeability tells me how badly water wants to move through that wall.
| Property | How we measure it | What it decides |
|---|---|---|
| Shear strength (cu, friction angle) | Lab tests, correlations | Earth pressure, wall moment |
| Density (SPT N or CPT) | Cone penetration test or SPT | Drivability, section robustness |
| Water table depth | Observation wells | Hydrostatic load, sealing needs |
| Permeability | Fall tests, gradation | Seepage control, interlock choice |
| Obstruction layers | Borehole recovery | Refusal risk, pre-drilling plan |
I once quoted two projects with the same wall height, one in coastal soft clay and one in dense sand. The sections ended up two class sizes apart, and the installation methods had nothing in common. Same drawing on paper, completely different piles. That is why I treat the soil report as the first document in the order, not the last. If you want a deeper look at how the wall actually carries these loads, our article on passive and active earth pressure explains the mechanics behind the table above.
There are also red flags I look for between the lines of a report. Boreholes spaced fifty meters apart will happily miss a gravel channel that eats a week of driving. A report with SPT values only in the upper layers tells me nobody measured the toe zone, which is exactly where refusal hides. And when the water table is recorded as “not observed” in a coastal project, I assume it is at dredge level until someone proves otherwise. Asking these questions costs an email. Ignoring them costs a variation order.
How Do Soft Clays and Silts Change Your Section Choice?
Soft ground looks easy to drive into, and that is exactly why it fools people. The pile slides down with almost no resistance, and the crew believes the job will be quick. Then the wall starts to move.
In soft clays and silts, low soil strength means the wall must resist large moments with little passive help, so you select for bending capacity and embedment depth, not for driving force.
Why soft soil pushes embedment deeper
In soft clay, the soil gives very little support below the excavation base. The wall has to develop its fixity much deeper, which increases the required embedment and the bending moment at the same time. Soft clays also creep, so walls that look stable in week one can lean by month three. This is where the Atterberg limits in the report earn their place: high plasticity clays shrink, swell, and squeeze, and they punish under-designed walls slowly and quietly.
| Soil condition | What it does to the wall | Selection response |
|---|---|---|
| Very soft clay (cu < 15 kPa) | Deep mud wave risk, low passive support | Deeper embedment, struts or anchors, moderate modulus |
| Soft to medium clay | High moment at excavation base | One class up in section modulus |
| Silt below water table | Water softens the layer, seepage risk | Seal interlocks, control drawdown |
| Peat layers | Almost zero lateral support | Ignore peat for passive support, use strong soils below |
Our project library includes a riverbank job in Southeast Asia where hot rolled U type piles were driven through soft alluvial clay. The contractor initially wanted the lightest section on the quotation. After we reviewed the clay strength, we moved up one class and added a anchor line. The wall is still straight today. I would rather argue about one steel class at quotation stage than argue about a curved wall six months later. If this is your situation, our article on soil retention and stability shows how the wall shares load when the ground is weak.
How Does Sand Density and Groundwater Shape the Design?
Sands bring a different trade-off. The soil is strong, so the wall gets good support, but driving resistance and water arrive together, and they pull the design in opposite directions.
Dense sands raise driving resistance and can refuse a light section, while loose water-bearing sands demand tight interlocks and seepage control. Read the N-value profile and the water table together, never separately.
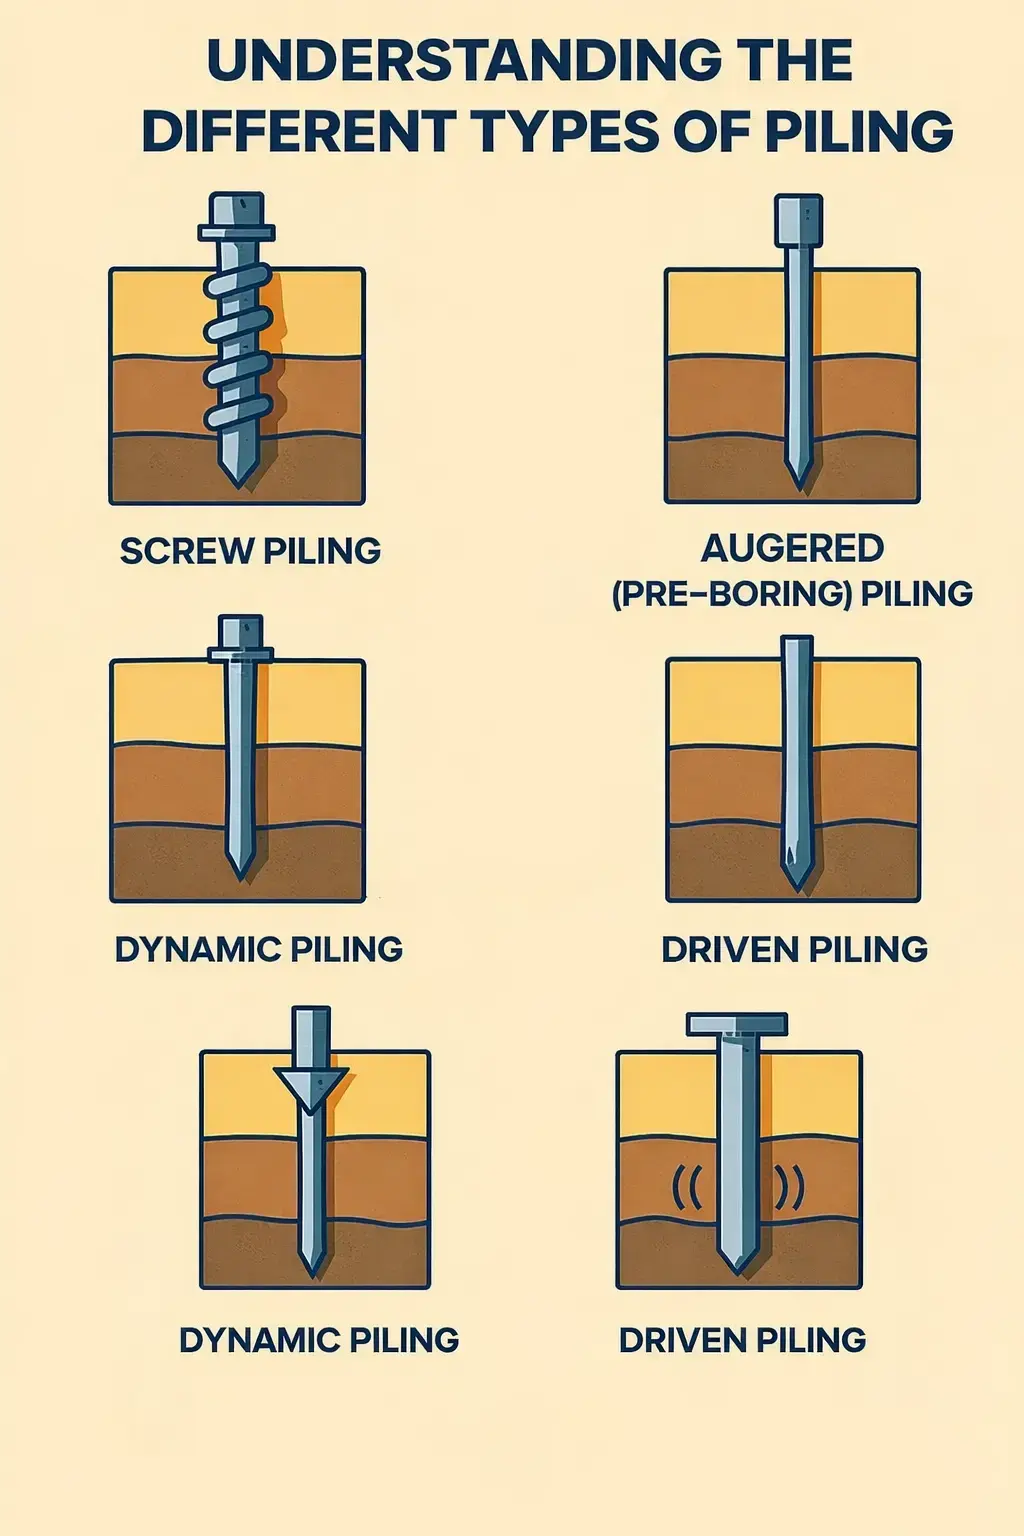
Driving resistance versus seepage control
In loose saturated sand, driving is easy but the wall leaks if the interlocks are loose, and the excavation base can fail by piping if embedment is too shallow. In dense sand, the wall is structurally comfortable but the pile must survive hammer stress at every meter. I always check the ratio between wall depth below the water table and embedment into the low-permeability layer. If water can travel under the wall and lift the excavation base, no section modulus will save you. That is a seepage problem, and we handle it with depth and sealing, which our cofferdam and deep excavation guide covers in detail.
| Sand condition | Driving reality | Water reality | What I specify |
|---|---|---|---|
| Loose sand, high water | Easy driving | Piping and seepage risk | Tighter interlocks, deeper toe, wellpoints |
| Medium dense sand | Smooth driving | Moderate seepage | Standard wall, check drawdown |
| Dense sand (N > 30) | Hard driving, refusal risk | Low seepage | Robust section, heavier hammer |
| Gravelly sand | Very hard, cobble risk | High permeability | Driving assist, filter design |
The soil also controls corrosion speed at waterfronts. Wet sand with oxygen fluctuation attacks steel fastest, so marine and river projects often justify a higher grade or added corrosion allowance, and we cover that logic in our corrosion resistance article. When a client sends me a sand profile, I spend most of my time between the N-values and the water table line. Those two curves agree more often than people expect, and when they disagree, the disagreement is the project risk.
One more habit worth copying from our Gulf clients: they log the driving blows per meter on the first ten piles. That simple record turns the soil report into calibration. If the fourth meter takes three times the blows of the third, we know the dense layer is higher than the boreholes suggested, and we adjust before pile fifty, not after pile two hundred. Data from the wall itself is the cheapest ground investigation you will ever get.
What Section Stiffness and Steel Grade Do Different Soils Demand?
Now we connect the ground to the catalogue. This is the step where the borehole log becomes a specific pile with a specific modulus and grade.
Soft soils and deep water loads push you up in section modulus and embedment, while hard soils push you up in section robustness and steel grade so the pile survives driving. Check both directions before you fix the section.
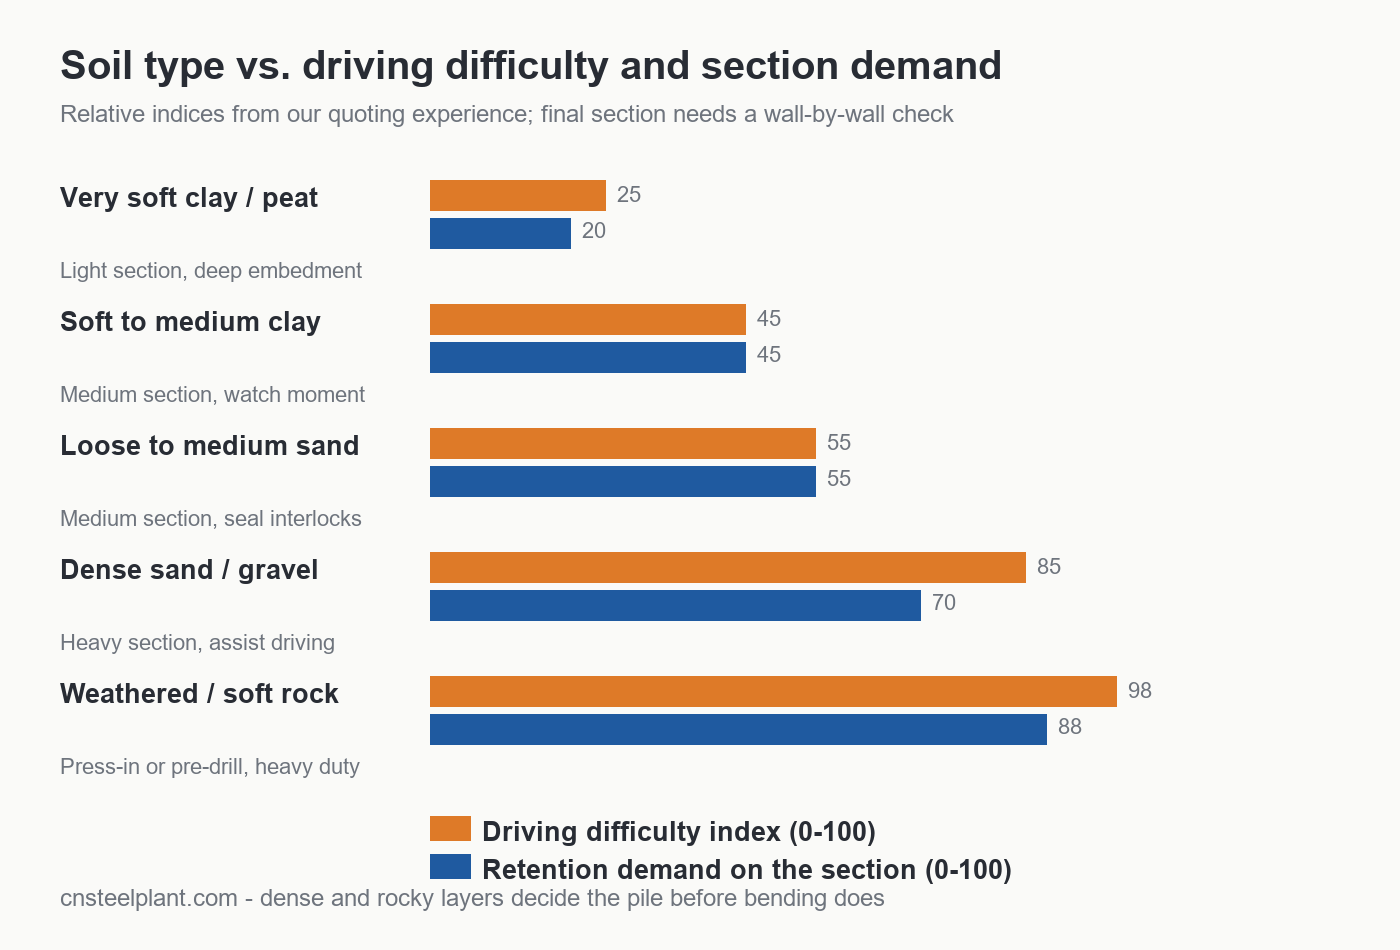
Matching modulus and grade to the ground
I treat selection as two separate checks. The first check is structural: does the section resist the bending moment from soil and water pressure with a safety margin? That check usually controls in soft soils and deep excavations. The second check is drivability: can the section be driven through the hardest layer without damage? That check usually controls in dense sands, gravels, and rock. A pile can pass the first check and fail the second, which is why I never size a wall from earth pressure alone. Our guide on dimensions, thickness and section modulus lists the numbers, and our article on load-bearing capacity shows the moment math.
| Ground condition | Structural driver | Drivability driver | Typical outcome |
|---|---|---|---|
| Very soft clay / peat | Large moment, deep fixity | None | Moderate modulus, deep embedment |
| Medium clay | Moment at base | Low | Standard section, one class margin |
| Loose wet sand | Seepage and pressure | Low | Sealing focus, standard modulus |
| Dense sand / gravel | Moderate moment | Hammer stress, refusal | Robust section, heavier grade |
| Weathered rock | Low | Refusal dominates | Press-in, pre-drill, or change system |
Steel grade matters most on the drivability side. A higher yield grade lets the section take harder hammer stress without permanent deformation, which is why we often suggest upgrading the grade instead of adding mass. Our overview of common steel grades for sheet piles compares the options. Grade is usually cheaper than tonnage, and in hard ground it is also the safer engineering choice.
How Do You Handle Gravel, Cobbles, and Rock During Driving?
This is the section I write from scar tissue. Refusal, pile tip damage, and driving out of interlock cost more money than any design error, and they almost always trace back to a layer somebody hoped was thin.
Treat any layer with cobbles, boulders, or rock as a driving risk first. Plan pre-drilling, jetting, or a press-in method before the piles arrive on site, and confirm the section can survive the hammer energy the layer will demand.
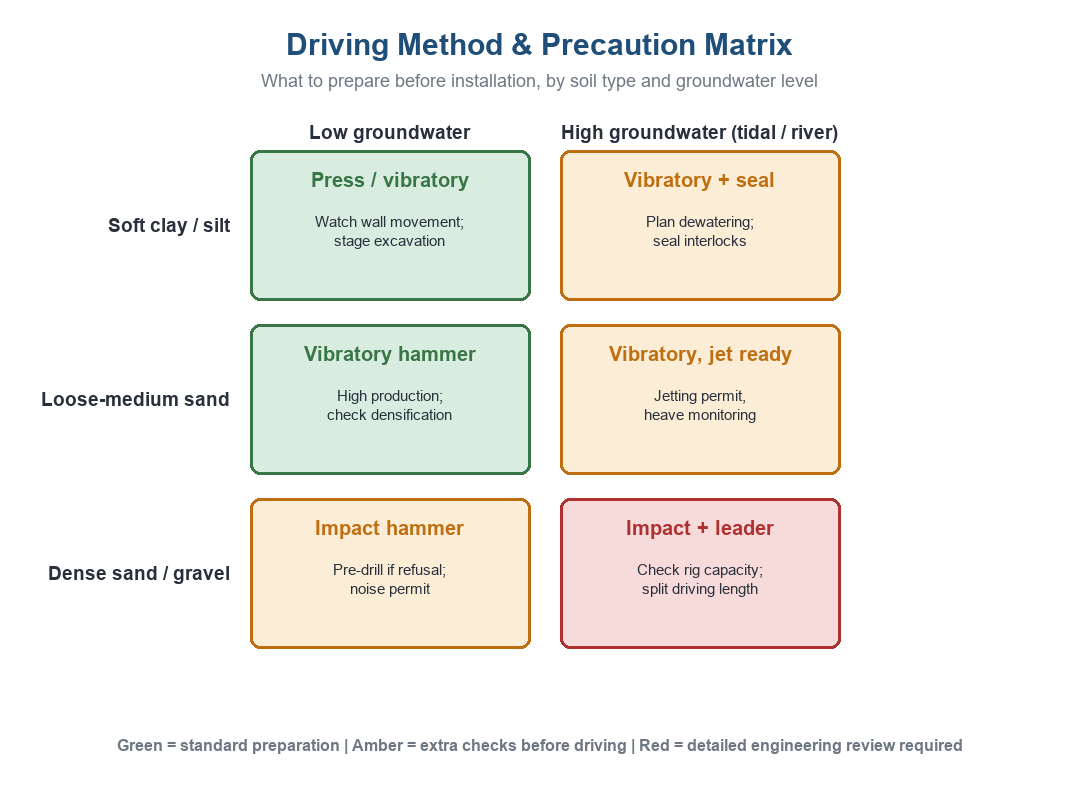
Practical ways through hard layers
My first question on a gravel or rock profile is simple: can the wall pass at all, and at what cost? Pre-drilling along the wall line loosens dense layers before driving. Jetting helps in clean sands and fine gravels but is restricted in many regions because of water use and settlement effects. Splicing or changing to a heavier section raises the energy the wall can absorb. In some ground, the honest answer is that a different system wins, and we cover those fallbacks in our article on common construction challenges and solutions.
| Obstacle | Risk if ignored | Practical answer |
|---|---|---|
| Dense gravel lens | Tip damage, refusal | Pre-drill wall line, heavier hammer |
| Boulders | Driving out of interlock | Probe ahead, extract and reset locally |
| Weathered rock | Refusal at toe | Shorter wall, pre-drill toe, rock socket design |
| Thin hard crust | Misjudged drivability | Test driving program before full order |
A vibratory hammer struggles in high-N granular soil, so the method choice is part of selection, not an afterthought. I always recommend a short test drive on the worst borehole location before we finalize tonnage. It costs a day and saves weeks.
The order of operations matters too. Pre-drilling after the piles arrive but before driving starts is normal. Pre-drilling after piles refuse is surgery, and surgery on driven walls is slow and ugly. Once two or three piles have refused and a crane is idle, the site team starts improvising, and improvised walls are where interlock damage and verticality problems begin. Plan the hard-layer response while the quotation is still open, when every option is still cheap.
My Take
After years of quoting across the Middle East, Australia, and Africa, my view is simple: the soil report is the cheapest engineering document on the project and the most ignored. Buyers will negotiate the steel price for weeks and never question a missing borehole.
At our factory in Liaocheng, we review every soil report before we quote. If the data is thin, we say so and ask for one more borehole at the wall line. We support OEM sections, flexible MOQ, and SGS inspection before shipment, and we export to contractors and distributors across Iraq, the UAE, Saudi Arabia, Pakistan, Australia, and Africa. When the report shows a layer we do not like, I put it in writing with the section recommendation. That habit has kept our clients out of more trouble than any price discount ever has.
Conclusion
Read the soil report first, then select. Strength sets the moment, water sets the sealing, density sets the hammer, and hard layers set the method.
Tags: steel sheet pile selection, soil conditions, sheet pile section modulus, geotechnical investigation, sheet pile drivability