Most sheet pile problems I see on job sites do not start on the job site. They start weeks earlier, in skipped checks and rushed paperwork.
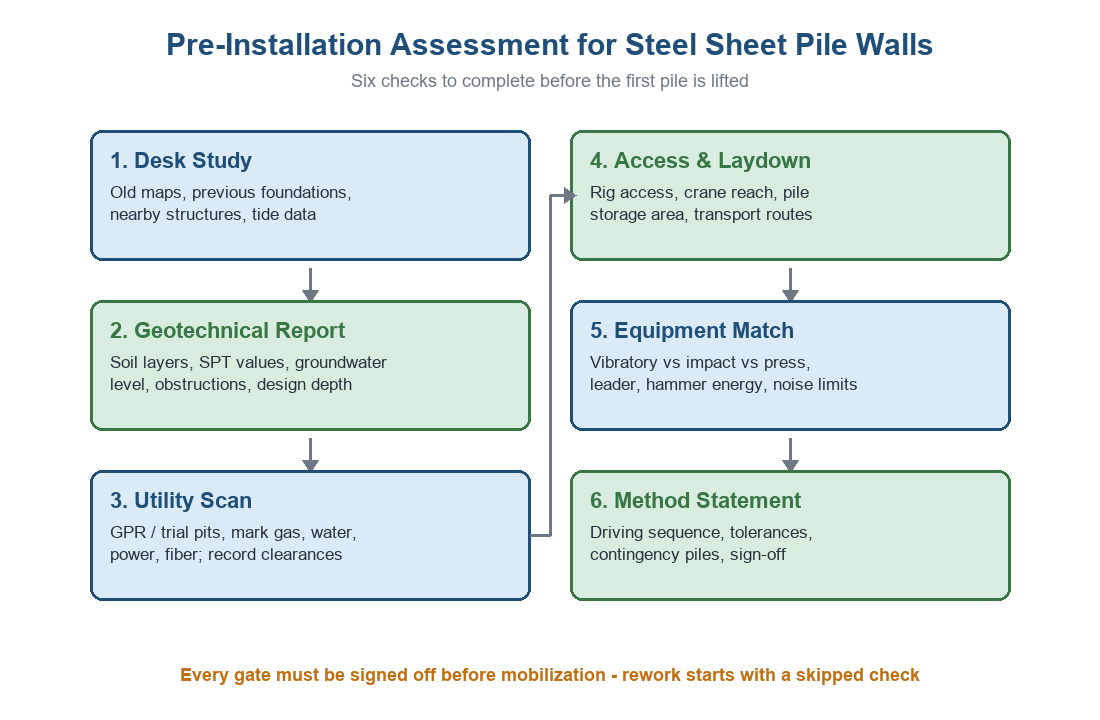
Before installing steel sheet piles, verify the geotechnical report, locate buried utilities, check groundwater, match the driving equipment to the soil, inspect the piles and interlocks, and agree on the driving sequence before the first pile is lifted.
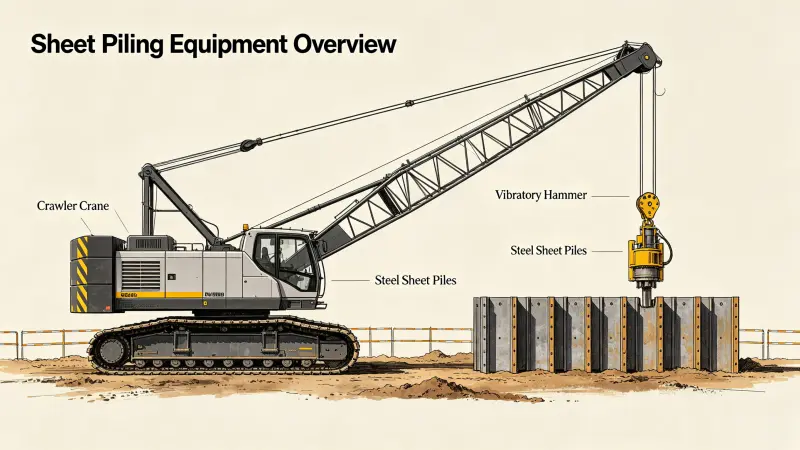
If you are a contractor preparing a method statement, an engineer checking a submittal, or a distributor advising your customer, this checklist is for you. I will walk through the checks our factory team discusses with every export customer before the first rig arrives.
Why Does the Geotechnical Report Come Before Everything Else?
A weak soil report makes every later decision a guess. I always ask for the current report before we quote a driving method.
The geotechnical report defines soil layers, driving resistance, groundwater level, and obstruction risk. Without it, pile selection, equipment choice, and depth control all become guesses that usually cost more than the report ever did.
What the Report Must Contain
A useful report lists each soil layer with its thickness, density or consistency, and the geotechnical investigation method behind the numbers. I look for standard penetration test values in sand and undrained shear strength in clay. These numbers tell me how the pile toe will behave and whether a vibratory hammer will stall.
Groundwater level matters as much as soil strength. It changes the effective stress, the stability of the excavation bottom, and the sealing requirements at the interlocks. A report that hides the water table is not a report I trust.
I also check the borehole spacing. For a long wall along a river, boreholes every 30 to 50 meters may be enough. For a small cofferdam with old city fill, I want boreholes much closer. One project in the Gulf had a hidden layer of cementitious fill between two boreholes. The rig hit it on pile four. A closer survey would have found it for a fraction of the standby cost.
| Report Item | Why It Matters | Risk If Missing |
|---|---|---|
| Soil layer profile | Sets driving resistance and depth | Wrong pile section, refusal |
| SPT / shear strength | Predicts drivability | Stalled hammers, damaged piles |
| Groundwater level | Controls stability and sealing | Boiling at excavation base |
| Obstruction notes | Warns of boulders and old foundations | Broken pile toes, schedule loss |
| Chemical attack data | Guides steel grade and coating | Early corrosion, thinning walls |
The last line matters for our export markets. In coastal sites across the Middle East, sulfate and chloride levels decide whether a standard grade works or whether we should supply a heavier section or a coated product. Where corrosion is the concern, our article on common steel grades used for steel sheet piles explains the choices.
Turning the Report Into a Drivability Check
Once I have the layers, I do a simple drivability check. Soft clay drives easy but gives little lateral support. Loose sand drives easy but wants a hammer matched to avoid refusal after a few meters of densification. Dense sand or gravel needs impact energy, and the report tells me early. This one page of thinking prevents most site surprises, and it is the reason I read the report before I quote anything.
How Do Groundwater and Soil Type Change Your Preparation?
The same pile behaves differently in dry sand and in tidal silt. Preparation must match both.
Soft clays need movement control and staged excavation. Sands drive fast but demand jetting or heave checks near groundwater. Dense layers need impact energy and stronger leaders. High water adds dewatering, sealing, and buoyancy checks before driving starts.
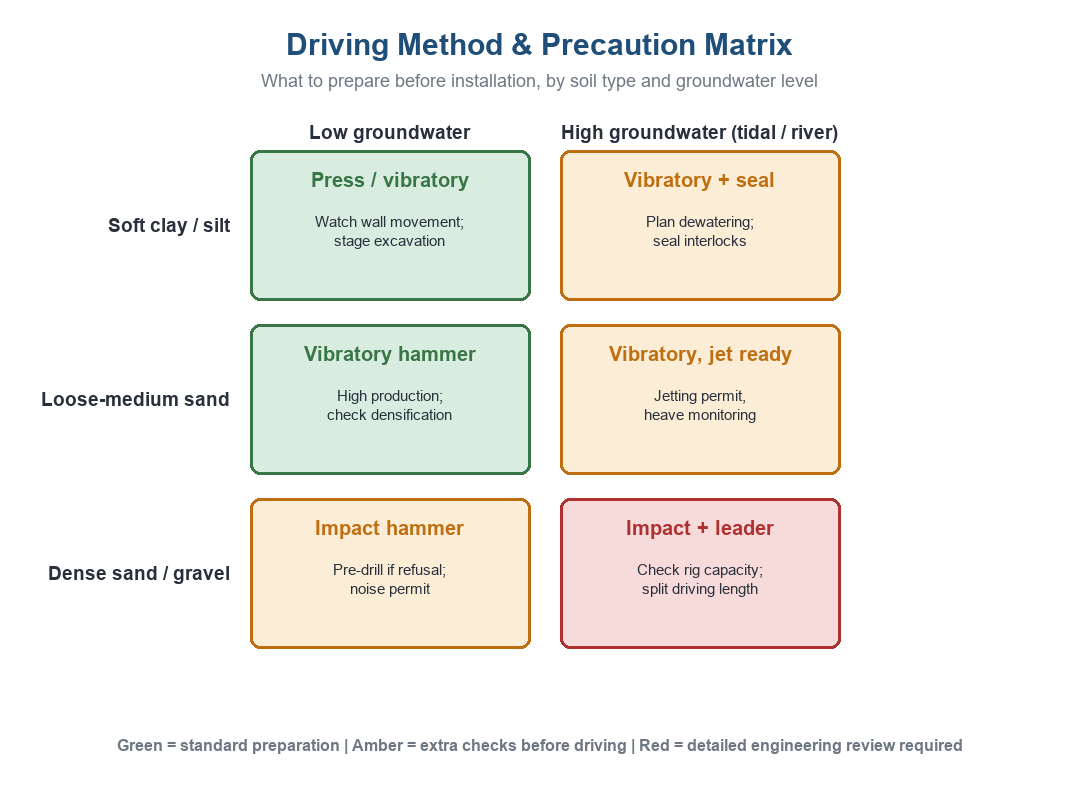
Reading the Matrix Before You Mobilize
I use a simple matrix with customers: soil type on one axis, groundwater on the other. Each cell points to a preparation task. In soft clay with low water, the task is monitoring wall movement and staging the excavation. In soft clay with high water, we plan dewatering and interlock sealing before the first sheet touches the ground.
| Ground Condition | Main Preparation Task | Who Confirms It |
|---|---|---|
| Soft clay, low water | Movement monitoring, staged dig | Geotechnical engineer |
| Soft clay, high water | Dewatering and interlock sealing | Designer + contractor |
| Loose sand, high water | Heave watch, jetting permit | Site engineer |
| Dense sand or gravel | Impact energy, split lengths | Piling foreman |
Sands are deceptive. A vibratory hammer flies through loose sand, then the last meter takes three times as long as the soil densifies around the toe. Near high groundwater, vibration can also cause heave in front of the wall. That is why the matrix reminds crews to watch the ground surface, not only the pile.
Dense layers change the equipment conversation. Impact driving needs a leader system that keeps the hammer centered, and often a pile length split into two sections. If the site is tidal, we plan the driving window around the water level, not around the calendar. In port and berth projects, this window planning is normal, and our notes on steel sheet piles for port and harbor protection projects show how contractors organize it.
Buoyancy and Base Stability
One preparation task gets forgotten: base stability. In high water, a deep excavation inside a sheet pile enclosure can fail by boiling at the bottom if the embedment is too shallow. The fix is designed before mobilization: deeper penetration, relief wells, or staged dewatering. Checking this on paper costs nothing. Discovering it in the pit costs everything, because the repair usually means redesign, not just pumping.
Which Hidden Utilities and Permits Can Stop the Job?
Nothing stops a site faster than a cut cable or a violation notice. Both are preventable with desk work.
Before mobilization, scan for buried utilities with ground penetrating radar or trial pits, secure driving and noise permits, confirm vibration limits near neighbors, and record every clearance in writing.
The Utility Scan
Utility drawings are often out of date. I treat them as a starting point, not as proof. A ground penetrating radar scan along the wall line finds the pipes and cables the drawings missed. Where the scan is unclear, we dig trial pits by hand. In one Middle East project, the scan found an unmapped sewer line in the first meter of the wall alignment. Moving the wall line by one meter cost half a day. Cutting the sewer would have cost weeks.
Overhead lines matter too. Sheet piles are long and cranes swing. I ask for a written clearance record between the crane boom and every overhead conductor. High-voltage lines do not forgive guesswork.
Permits and Neighbors
Many cities now require noise and vibration permits for piling. In urban basements and subway and underground engineering works, the vibration limits often decide the method before the soil does. Press-in systems exist for exactly these sites, but they are slower, so the schedule must absorb it. I tell customers to secure the permit first and choose the hammer second, not the other way around.
| Check | Typical Evidence | Common Failure |
|---|---|---|
| Utility scan | GPR report, trial pit logs | Trusting outdated drawings |
| Overhead clearance | Written survey record | Boom contact during swing |
| Noise permit | Approved application | Night work stopped by city |
| Vibration limits | Monitoring plan | Cracks claimed by neighbors |
| Access approval | Road authority letter | Loader truck denied entry |
Access and Laydown Space
Permits also cover the road itself. A rig needs a stable platform, and trucks need turning space. I ask for a simple site plan showing the laydown area for piles, the crane position, and the truck route. Sheet piles stored on soft ground bend under their own weight, and a bent pile wastes a morning.
How Do You Match the Driving Equipment to the Site?
The hammer is not a detail. It decides whether the wall goes in clean or comes back as a claim.
Match the hammer to the soil and the pile section: vibratory hammers for sand and soft clay, impact hammers for dense layers, press-in rigs for vibration-sensitive sites, with leaders sized to keep the hammer aligned on the pile head.
Choosing Between Vibratory, Impact, and Pressing
A vibratory hammer clamps on the pile and shakes it into the ground. It is fast, quieter, and my default for most soils. An impact hammer concentrates energy at the toe and wins in dense sand, gravel, and hard layers. A press-in rig pushes piles with static force where vibration limits rule out both. Each choice shapes the crane size, the power pack, and the noise plan.
I compare the options with the contractor before mobilization, using the soils from the report. Our earlier comparison of steel sheet pile installation methods: vibratory vs impact driving breaks down the trade-offs in detail.
| Equipment | Best Ground | Watch Out For |
|---|---|---|
| Vibratory hammer | Sand, silt, soft clay | Refusal after densification |
| Impact hammer | Dense sand, gravel | Noise, off-center blows |
| Press-in rig | City centers | Slow production, reaction force |
| Crane + leader | All methods | Boom reach and capacity |
Crane, Leaders, and Power
The hammer is only part of the system. The crane must lift the pile, hold it, and absorb the hammer reaction. Leaders keep the hammer centered on the pile head; an off-center blow cracks interlocks and starts a lean that is hard to stop. I also confirm the power pack fuel and hydraulic hoses are on site before day one. Half of the slow starts I see are logistics, not soil.
Contingency Equipment
One more question belongs in the plan: what happens if the hammer stalls? I like a standby impact option or a jetting arrangement agreed in advance. Mobilizing a second hammer mid-project takes weeks in many countries. A paragraph in the method statement is cheaper than that wait.
What Should You Inspect on the Piles Before Lifting?
The best preparation means nothing if the material is wrong. I inspect deliveries like a skeptic.
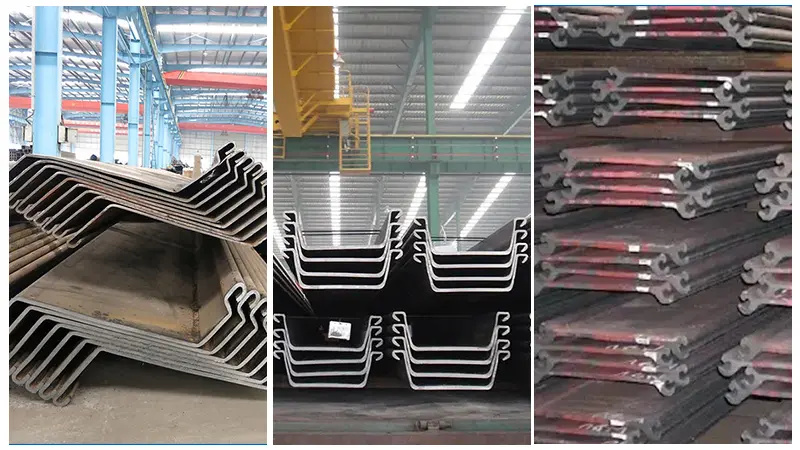
Inspect each delivery for straightness, interlock condition, length marks, steel grade certificates, and surface condition, and match the piles against the order before any pile is lifted.
The Receiving Checklist
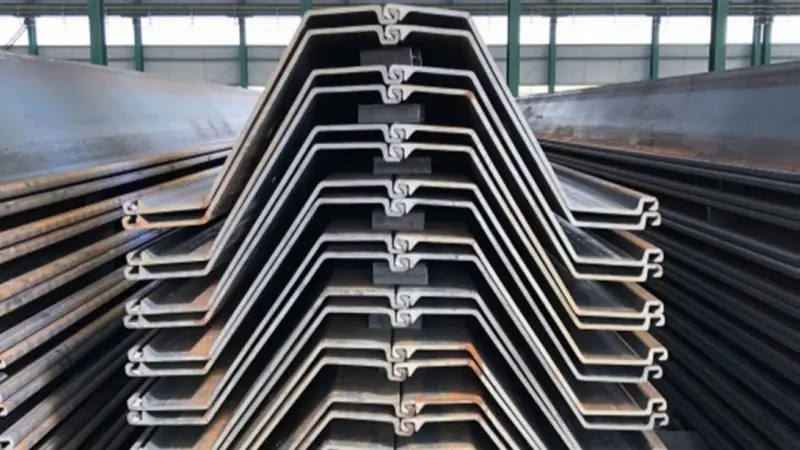
On arrival, we check straightness by sighting along the pile. Small bows from transport are acceptable; sharp kinks are not. The interlock lips must be full and unbent, because a damaged clutch stops the wall. Length marks must match the delivery note, and the grade must match the mill certificate. For export orders we arrange SGS inspection before shipment, so the customer receives documented quality, not promises.
| Item | Pass | Reject |
|---|---|---|
| Straightness | Gentle transport bow | Kinks, local bends |
| Interlock | Full lips, clean clutch | Flattened or split lips |
| Surface | Mill scale, light rust | Deep pitting, lamination |
| Marking | Correct length and grade | Mixed or missing marks |
| Documents | Mill cert matches order | Missing or altered certs |
Grade mix-ups are rare but serious. A Q235 pile installed where the design called for S355 weakens the wall where nobody can see it. That is why we stamp and tag each bundle, and why our article on steel sheet pile interlock types and their performance advantages recommends checking clutch condition before lifting, not after refusal.
Storage Before Driving
Inspection continues into storage. Piles should rest on timber bearers, stacked in one direction, with interlocks clean and lightly lubricated if the soil is sticky. Clay packed inside a clutch turns into concrete in the sun. Two minutes of cleaning per pile saves hours of driving resistance later. We also keep a small spare pile percentage on site, because transport and driving always claim a few.
How Do You Plan the Driving Sequence Before the First Blow?
The order of driving decides the geometry of the wall. It is planned on paper, not improvised on site.
Plan the driving sequence on paper: set panel points, drive corner and first piles carefully as references, alternate directions to keep the wall straight, and agree tolerances and correction rules before mobilization.
Panels, Corners, and References
Most walls install best in panels. Two piles at the panel ends are pitched and driven part-depth as references, then the piles between them follow. Corners go in first because they define the geometry, especially in cofferdams and deep excavations where the enclosure must close exactly.
I also agree the tolerance rules in advance: what verticality deviation is acceptable, when to stop and pull, and who decides. These rules belong in the method statement next to the driving sequence. Our guide on the step-by-step steel sheet pile installation process shows where each check sits in the sequence.
Temporary or Permanent Changes the Plan
A temporary wall for a basement accepts a different tolerance than a permanent waterfront structure. Corrosion allowance, cutoff elevation, and even the pile section change with design life. We explain the differences in temporary vs permanent steel sheet pile retaining walls, and I bring them into the pre-installation review, because a permanent wall planned as temporary always fails the handover inspection.
Weather and Water Windows
Finally, the sequence respects the site calendar. Tidal work needs low-water windows. Monsoon sites need drainage ready before the first storm. In our export markets, from river embankments in Southeast Asia to coastal works in the Gulf, I have seen weather windows move schedules more than soil ever did. Planning them early is free.
| Planning Item | Written Before Mobilization | Failure Cost |
|---|---|---|
| Panel layout | Panel points on the survey plan | Wandering wall line |
| Corner piles | Corner geometry checked | Closure problems |
| Tolerances | Limits and correction rules | Disputes at handover |
| Water windows | Tide or season calendar | Standby rig costs |
My Take: What Twenty Years of Factory and Site Visits Taught Me
After years of watching projects succeed and fail, I believe most installation failures are paperwork failures. The soil was in the report. The sewer was on the old drawing. The interlock was damaged by the wrong lifting chain. Almost nothing on a sheet pile site is a true surprise; it is information somebody had but nobody shared.
So my advice is simple: hold a pre-installation review with every party at the same table. The foreman, the surveyor, the hammer operator, and the supplier. One hour of shared pictures and drawings beats a week of radio arguments on site. I ask our customers to invite us to that review, because we have seen hundreds of sites and can often name the exact check that saved a similar project.
One habit worth copying: the best crews keep a one-page daily log of driving blows, lean corrections, and interlock problems. It costs five minutes a day and turns a “difficult site” into a documented, defensible record.
Conclusion
Strong steel sheet pile installation starts before mobilization: verified ground, scanned utilities, matched equipment, inspected piles, and a planned sequence. Check early, drive fast, and the wall will perform.
Tags: steel sheet pile installation, pre-installation checklist, geotechnical investigation, sheet pile driving equipment, sheet pile inspection